Important:
- Please allow 5 minutes before trying to activate your eSIM.
- The following details are specific to FreedomPop Premium SIMs and apply only to Android phones.
- If you're using an iPhone, please click here for relevant information.
Table of Contents
Important!
Is your phone eSIM compatible?
See if your device is compatible by selecting it from the list below.
If your device is incompatible or not on this list, your phone cannot be used with an eSIM. Please consider one of our physical SIM cards. We will mail it directly to you.
Visit freedompop.com/plans and choose a plan. Then select physical SIM.
Now, Let's Set up Your New eSIM:
If your device is compatible, let's continue.
Note: The names of the buttons or folders on your phone might differ based on your device model. For instance, on a Samsung phone, you'll find internet and Wi-Fi settings under a folder named "Connections," On a Google Pixel phone, these settings are located in a folder called "Network & Internet." We're here to assist you with setting up your new eSIM. However, if you encounter any issues, refer to your phone's user manual for specific instructions on setting up the eSIM.
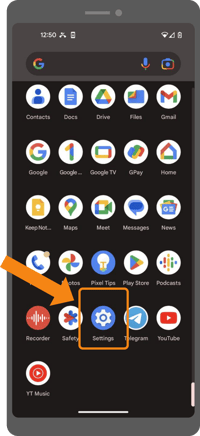
Step 1: Open your phone’s Settings application.
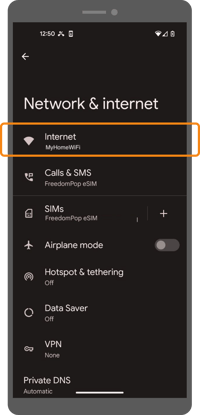
Step 2: Tap on your phone’s Internet connection settings. This button may be called some variation of the following:
- Internet
- Internet Settings
- Connections
- Mobile Networks
- Mobile Data
- Etc.

Step 3: Connect your phone to your local WiFi network.
Step 4: Return to your Internet Connection settings once you're on WiFi.
Step 5: Using a Samsung phone? Tap SIM card manager. Otherwise, skip this step.
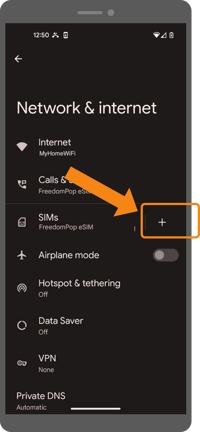
Step 6: Add a new SIM. The new SIM button may be called some variation of the following:
- Select New SIM
- Add Mobile Plan
- Add Carrier
- Etc.
- This might also look like a + sign next to the SIM section.
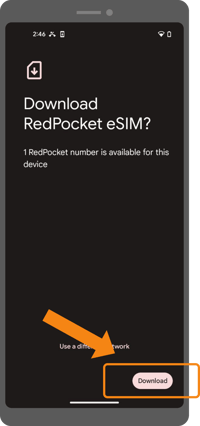
Step 7: Choose to add your new eSIM with a QR code.
Step 8: Scan your QR code. After you complete the activation process, you will receive this code. It will appear on the screen, or you can access it by clicking on the link sent to you by email. Hold your phone up to the screen to scan the QR code.
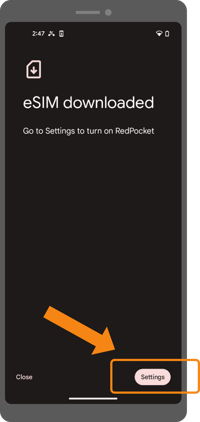
Step 9: Downloading the new profile may take a few minutes.
Important:
Your SIM might be identified as part of "Red Pocket Mobile." After scanning the QR code with your phone, stay on the current screen to finish the setup. You cannot scan the QR code a second time. It's important not to remove, erase, delete, or uninstall your eSIM profile from your phone, as you won't be able to retrieve it once it's been deleted.
Step 10: After the download is complete, you’ll be redirected to the SIM card Settings page. This page allows you to enable your SIM card and set your calling, texting, and internet usage preferences.
Step 11: Answer the on-screen questions to give your eSIM a name and decide which line will be your primary.
Step 12: Wait 10 minutes, then test out a call, a text message, or try to open a webpage.
Still No Connection?
If you've completed all of the above steps but still cannot connect to the Internet, place or receive a call, or send and receive text messages, you may need to complete one more step: configuring your Access Point Name (APN) settings.
Step 1: Go back to your Internet Connection settings. Again, this may be called some variation of the following:
-
- Internet
- Internet Settings
- Connections
- Mobile Networks
- Mobile Data
- Etc.
-
- Mobile Networks
- Mobile Data
- Cellular Network
- Etc.
Step 3: Select your newly added eSIM. Again, this may be labeled under the parent company “Red Pocket Mobile. " On some phones, you may have to tap on Access Point Names before you can tap your newly added eSIM.
Step 4: Scroll down and tap on “Access Point Names”.
Step 5: Tap on your newly added eSIM to make changes. On some phones, you may need to tap the three dots in the top right corner and “Edit” first.
Step 6: Update the name of the APN setting to FreedomPop if necessary.
Step 7: Update the APN setting based on your network.
-
- On GSMA, update the APN setting to ERESELLER
- On GSMT, update that setting to WHOLESALE
Step 8: Tap the three dots in the top right corner.
Step 9: Tap Save.
Step 10: Wait 10 minutes, then test out a call, a text message, or try to open a webpage.
Need More Assistance?
Contact us for additional assistance. If you still do not have a wireless connection, a FreedomPop support agent can help. Call us at 1-888-702-8302 Monday through Friday from 8 AM to 5 PM PST or email us at support@freedompop.com.